Updates21/Apr/03 - Original.22/Apr/03 - Various suggestions from Scott Smith, Andy Polyakov and Dan Dennedy applied. 24/Apr/03 - Improved explanation of .sub file format and menus. 5/May/03 - Updated to dvdauthor 0.5.3 14-15/May/03 - Clarifications 17/May/03 - More clarifications. 22/Sep/03 - Added alternative to jpeg2yuv. 31/Dec/03 - Updated authoring section to dvdauthor version 0.6.x 3/Jan/04 - Added a second example and some comments on bitrates. 21/Jan/04 - Corrected allowed contents of vmgm block and added a table of contents. 24/Jan/04 - Minor tweaks. |
This document offers a few clarifications and thoughts on writing DVDs and in particular DVD videos under Linux. I shall concentrate on the processes that I personally use, rather than attempting to write a fully general guide. So the emphasis will be on converting digital video recordings and transferring them to DVD.
Standard Disclaimer: Take all you read with a generous pinch of salt mixed with scepticism. What appears here seems to work for me. It may work for you, it might not, it could even be harmful. Stay alert, and if things look bad bail out. To a very great extent this document was written to help me to remember what to do and to help me find the bits I didn't understand.
Most of what is here is in the web pages of the software packages I mention, or their mailing-list archives. All I've really done is to try to make it a little easier to find. I welcome suggestions, clarifications etc. (especially on the sections in red), I'm still feeling my way in this.
Obviously if you are going to make DVD videos you need a number of hardware tools.
Some writers on the market support more than one format for writing. Unless your writer does, you need to make sure you use the correct media for the writer.
Note that not all DVD-ROM drives and DVD players can read rewritable media (as is the case with CD media). Of the 4 DVD-ROM drives to which I have easy access one (the oldest of them) is unable to recognise DVD+RW disks but does handle both DVD+R and DVD-R (I don't have any DVD-RW media with which to test it); my hardware player handles DVD+R and +RW without any problems. www.dvdplusrw.org has some listings of compatibility. As with all media compatibility issues your mileage may vary, if a device is marginal, then different machines of the same model may not give the same results. If you do have problems, it's always worth cleaning the lens.
It is also worth noting at this point that the 4.7GB typically listed as the capacity are salesman's GB (i.e. 109 bytes rather than 230 bytes) you can actually get about 4.4GB onto a disk.
The larger distributions (e.g. SuSE and Debian) probably have most of the software needed, but unless you are running Debian Unstable they may be old versions that only support a limited subset of the capabilities of current versions. This field is evolving rather quickly, which is part of the reason why documentation is in short supply, it also means that by the time I've finished writing this it will probably be out of date.
It is possible that your distribution's stock kernels don't support Firewire, although I think most do now (check for /lib/modules/<version>/kernel/drivers/ieee1394, if that directory exists and contains raw1394.o and video1394.o you may not need to do anything special here -- however if you have problems with the interface it may be worth trying a newer version).
If you need to build you own kernel, it is almost certainly worth getting the latest ieee1394 drivers for 2.4 from The Linux IEEE1394 page before building, however be aware that the latest versions are not compatible with the 2.4.20 pre-emptive kernel patch. To get at the IEEE1394 drivers you need to enable prompting for development drivers, other than that it's pretty much the standard routine.
Kino is able to control the transfer of the video stream from the camera to the computer. Kino is also a solid basic video editor that allows you to split and join scenes, export to various formats and most of the other stuff you need to get your raw video into a useable form. This an essential tool.
There is now a titling tool dvtitler available for kino version 0.7 which can be downloaded from the same site. The capabilities are fairly basic, but it will do the job.
Obviously firstly you need to record something! Suggestions on subject matter, video techniques etc. are WAY beyond the scope of this page.
Kino is the tool for this job.
Connect the camera to a firewire port and switch it into "Playback" mode, then start kino. You will probably need to configure kino to default to putting things in sensible places, and to use sensible default formats (in particular, I recommend setting the default save format to DV2 as that can be played by xine). As an interesting aside, the Windows software that comes with my camera only supports downloading stills (or so the manual says), but kino does the full works.
To get data off the tape, go to the "Capture" tab of kino. This allows you to set up the options and transfer movies to your hard disk. By default A/VC (Audio/Video Control) is disabled--enable it, otherwise kino will not be able to start and stop the camera. You can now manoeuvre around the tape with the navigation buttons and control capture with the capture buttons. When transferring video, kino automatically inserts scene breaks each time the camera was stopped and restarted (I think it also occasionally inserts breaks it shouldn't, but I'm not absolutely certain there). As a guide, a full DV tape needs about 13-14GB of disk space.
I don't know anything about cameras that use memory sticks.
Again this is a job that can be done with kino. I've not tried it, but it looks as if avidemux also has similar editing capabilities.
Basically all you need do is read in the files you saved earlier, put them into a sensible order and cut the bits you don't need. There are some more advanced editing features as well, but I've not done much with them. The editing capabilities of kino are pretty self-explanatory. Get familiar with the timeline tool as a means of coarse navigation, it will save you a lot of time looking for cut points.
In order for DVD players (whether software or hardware) to be able to play your movie it has to be in a suitable format. The easiest way to do this if you are using kino is to go to kino's export tab. There you need to find the mpeg export tab, which is hidden until you start to move along the export types (it's the last one).
One of the big advantages of DVD over video is that it is a random-access medium which means that it is possible to have menus which allow you to to select what you want to see, rather than having to scan to roughly where you want which is both time-consuming and inaccurate (at least on my VCR).
To understand menus (and in particular the limits of what can be done with dvdauthor) you need a basic understanding of the hierarchy of structure within a video DVD.
Menus can be associated with either the whole disk (VMGM) or with a titleset (VTSM), there can be more than one menu of either type. The simplest use of menus is to navigate within the disk. There are some limitations on the targets of navigation menus:
The basic process of creating a menu is described in the document menu.txt in the current version of dvdauthor, however there are a few extras to bear in mind.
This example creates a DVD with a main menu, 4 titlesets each containing a menu and a single title. The titles are all made from multiple input files and each input file is one chapter. Of course there are many other permutations possible, it's just that this format is convenient for the kind of material I normally work with; the documentation that comes with dvdauthor should be sufficient to allow you to go from this example to the format you want.
I shall assume that the individual chapters of the DVD have been saved
as mpeg-2 files from kino as described above.
Making the menu
Menus are just an mpeg file with subtitles. The basic mpeg is the background and the subtitles produce the menu buttons. The background can either be a short movie or a still image converted to an mpeg, in the example here we use the latter.
This example assumes reasonable familiarity with the gimp.
There are probably many other ways to do this, but this is a route with which I am comfortable.
This is just a short (even single-framed) mpeg-2 file. It appears to need a sound track even if it is just silence. If you are working from a scanned image or an image from a still camera, you need to be aware that DVDs have non-square pixels, this can be handled either with the DPI in gimp or the aspect settings in the mpec encoding process (generally I use the latter for no better reason than I figured the correct settings there first).
Create your background image this should also contain any text that is part of the buttons (in this case it's just a title on the gimp's waves pattern. For PAL this image should be 720x576 pixels, for NTSC it should be 720x480 (SECAM I don't know). It is recommended to save this image in JPEG format.
The sound track can be made by recording a short (couple of seconds) sample from a sound card with nothing connected, and then converting it to an mp2 format with mp2enc. This shold be done at 48kHz sampling rather than the more common (for CDs) 44.1kHz.
If you are going to use a short movie clip, the you don't have to make a background image, just use the clip as the argument of spumux after following the procedure described here to make the subtitle images.
Create your subtitle images. There are in fact 3 of them: the basic subtitles image which is used to show buttons in their "quiet" state, the highlight image which shows when a button is under the cursor, and the selected image which shows after the button has been clicked until its action has begun. If you are going to use automatic button identification (and why not it's a lot easier) you need to have transparent space between the locations in all the images. It will also make life easier if you put your buttons in nice rows and columns (the menu generator can handle either row-major or column-major layouts). I suggest using the guide bars in gimp to make a nice grid. It is recommended to save these images in PNG format. I shall not attempt to give a gimp tutorial here, there are many on the web, most of them far better than I could manage.
There are a number of important points to note:
In the example here, the basic image (main6.png) is just the button texts in black, the selected image (main6s.png) is the same thing but with red text, while the highlight image (main6h.png) adds a background to the buttons (and will thus be the one that defines the sizes). If you make use of the gimp's save as option and do the images in that order, you won't need to retype the text with the consequent worries about alignment. I like to have a systematic naming convention for the images as that allows a simple shell script to make the menu mpeg files.
spumux, the subtitler in current versions of dvdauthor uses an XML control file to define how the subtitles are created. The example here is just about as basic as it can be:
<subpictures>
 <stream>
   <spu
       force="yes"
       start="00:00:00.00"
       image="main6.png"
       select="main6s.png"
       highlight="main6h.png"
       autooutline="infer"
       outlinewidth="6"
       autoorder="rows">
 </spu>
 </stream>
</subpictures>
#!/bin/sh

rm -f ${1}.mpg

jpegtopnm Background.jpg | ppmtoy4m -n 1 -F25:1 -I t -A 59:54 -L | mpeg2enc -f 8 -n p -o ${1}.m2v
mplex -f 8 -o /dev/stdout ${1}.m2v silent.mp2 | spumux -v 2 ${1}.xml > ${1}.mpg
With the examples above, if the xml files was saved as main6.xml, then calling this script with the argument
main6 will convert the images to an mpeg file that can be included in a DVD as a menu.
Notes:
This is the job of dvdauthor. This description refers to the alpha version of dvdauthor-0.6.8. The interface of 0.6.x versions is totally different from 0.5.x and earlier, so this won't work for old versions.
Like spumux, dvdautor now uses an XML control file that specifies the structure of the DVD being authored. The contruction of a suitable XML file is the greatest challenge for the newcomer to dvdauthor. In the example here I shall deconstruct a particular XML file and comment on its important features.
<dvdauthor dest="/data6/video/Sheffield6/">
This is the overall top-level tag. The attibute tells dvdauthor the directory in which to put the VIDEO_TS (and AUDIO_TS) directories.
<vmgm>
<menus>
<video format="pal"></video>
<pgc entry="title">
<vob file="main6.mpg"></vob>
<button>jump titleset 1 menu;</button>
<button>jump titleset 2 menu;</button>
<button>jump titleset 3 menu;</button>
<button>jump titleset 4 menu;</button>
<button>exit;</button>
</pgc>
</menus>
</vmgm>
<titleset>
<menus>
<pgc entry="root">
<vob file="sat_am6.mpg"></vob>
<button>jump title 1 chapter 1;</button>
<button>jump title 1 chapter 2;</button>
<button>jump title 1 chapter 3;</button>
<button>jump title 1 chapter 4;</button>
<button>jump title 1 chapter 5;</button>
<button>jump title 1 chapter 6;</button>
<button>jump title 1 chapter 7;</button>
<button>jump title 1 chapter 8;</button>
<button>jump title 1 chapter 9;</button>
<button>jump title 1 chapter 10;</button>
<button>jump vmgm menu;</button>
</pgc>
</menus>
<titles>
<pgc>
<vob file="swimb000_001.mpeg"></vob>
<vob file="swimb001_001.mpeg"></vob>
<vob file="swimb002_001.mpeg"></vob>
<vob file="swimb003_001.mpeg"></vob>
<vob file="swimb004_001.mpeg"></vob>
<vob file="swimb005_001.mpeg"></vob>
<vob file="swimb006_001.mpeg"></vob>
<vob file="swimb007_001.mpeg"></vob>
<vob file="swimb008_001.mpeg"></vob>
<vob file="swimb009_001.mpeg"></vob>
<post>call vmgm menu;</post>
</pgc>
</titles>
</titleset>
<titleset>
<menus>
<pgc entry="root">
<vob file="sat_pm6.mpg"></vob>
<button>jump title 1 chapter 1;</button>
<button>jump title 1 chapter 2;</button>
<button>jump title 1 chapter 3;</button>
<button>jump title 1 chapter 4;</button>
<button>jump title 1 chapter 5;</button>
<button>jump title 1 chapter 6;</button>
<button>jump title 1 chapter 7;</button>
<button>jump title 1 chapter 8;</button>
<button>jump vmgm menu;</button>
</pgc>
</menus>
<titles>
<pgc>
<vob file="swimb010_001.mpeg"></vob>
<vob file="swimb011_001.mpeg"></vob>
<vob file="swimb013_001.mpeg"></vob>
<vob file="swimb014_001.mpeg"></vob>
<vob file="swimb015_001.mpeg"></vob>
<vob file="swimb016_001.mpeg"></vob>
<vob file="swimb017_001.mpeg"></vob>
<vob file="swimb018_001.mpeg"></vob>
<post>call vmgm menu;</post>
</pgc>
</titles>
</titleset>


<titleset>
<menus>
<pgc entry="root">
<vob file="sun_am6.mpg"></vob>
<button>jump title 1 chapter 1;</button>
<button>jump title 1 chapter 2;</button>
<button>jump title 1 chapter 3;</button>
<button>jump title 1 chapter 4;</button>
<button>jump title 1 chapter 5;</button>
<button>jump title 1 chapter 6;</button>
<button>jump title 1 chapter 7;</button>
<button>jump title 1 chapter 8;</button>
<button>jump vmgm menu;</button>
</pgc>
</menus>
<titles>
<pgc>
<vob file="swimb019_001.mpeg"></vob>
<vob file="swimb020_001.mpeg"></vob>
<vob file="swimb021_001.mpeg"></vob>
<vob file="swimb022_001.mpeg"></vob>
<vob file="swimb023_001.mpeg"></vob>
<vob file="swimb024_001.mpeg"></vob>
<vob file="swimb025_001.mpeg"></vob>
<vob file="swimb026_001.mpeg"></vob>
<post>call vmgm menu;</post>
</pgc>
</titles>
</titleset>

<titleset>
<menus>
<pgc entry="root">
<vob file="sun_pm6.mpg"></vob>
<button>jump title 1 chapter 1;</button>
<button>jump title 1 chapter 2;</button>
<button>jump title 1 chapter 3;</button>
<button>jump vmgm menu;</button>
</pgc>
</menus>
<titles>
<pgc>
<vob file="swimb027_001.mpeg"></vob>
<vob file="swimb028_001.mpeg"></vob>
<vob file="swimb029_001.mpeg"></vob>
<post>call vmgm menu;</post>
</pgc>
</titles>
</titleset>

</dvdauthor>
The remaining three titlesets are very similar to the first, each has one menu and one title, but with differing numbers of chapters.
If this file is saved as dvd.xml in the same directory as all the mpeg files, then the command:
dvdauthor -x dvd.xmlshould produce a dvd image in the directory /data6/video/Sheffield6.
This is a slightly more complex example which shows how to have several menus in one titleset and also several titles in the titleset. Repetitive passages have been compressed to save space.
<dvdauthor dest="/data6/video/Combined/">
<vmgm>
<menus>
<video format="pal"></video>
<pgc entry="title" pause="5">
<vob file="Top.mpg"></vob>
<button>jump titleset 1 menu;</button>
<button>jump titleset 2 menu;</button>
<button>exit;</button>
</pgc>
</menus>
</vmgm>
The top-level or title menu here is very similar to the previous example.
<titleset>
<menus>
<pgc entry="root">
<vob file="M_Main.mpg"></vob>
<button>jump menu 2;</button>
<button>jump menu 3;</button>
<button>jump menu 4;</button>
<button>jump menu 5;</button>
<button>jump menu 6;</button>
<button>jump vmgm menu;</button>
</pgc>

<pgc>
<vob file="Tue.mpg"></vob>
<button>jump title 1 chapter 1;</button>
<button>jump title 1 chapter 2;</button>
<button>jump title 1 chapter 4;</button>
<button>jump title 1 chapter 6;</button>
<button>jump title 1 chapter 8;</button>
<button>jump  menu 1;</button>
</pgc>
.
.
.
<pgc>
<vob file="Sat.mpg"></vob>
<button>jump title 5 chapter 1;</button>
<button>jump title 5 chapter 2;</button>
<button>jump title 5 chapter 3;</button>
<button>jump title 5 chapter 5;</button>
<button>jump title 5 chapter 6;</button>
<button>jump  menu 1;</button>
</pgc>
</menus>
<titles>
<pgc>
<vob file="Day1_000_001.mpeg"></vob>
<vob file="Day1_001_001.mpeg"></vob>
<vob file="Day1_002_001.mpeg"></vob>
<vob file="Day1_003_001.mpeg"></vob>
<vob file="Day1_004_001.mpeg"></vob>
<vob file="Day1_005_001.mpeg"></vob>
<vob file="Day1_006_001.mpeg"></vob>
<vob file="Day1_007_001.mpeg"></vob>
<vob file="Day1_008_001.mpeg"></vob>
<post>call menu;</post>
</pgc>

<pgc>
<vob file="Day2_000_001.mpeg"></vob>
<vob file="Day2_001_001.mpeg"></vob>
<vob file="Day2_002_001.mpeg"></vob>
<vob file="Day2_003_001.mpeg"></vob>
<vob file="Day2_004_001.mpeg"></vob>
<vob file="Day2_005_001.mpeg"></vob>
<vob file="Day2_006_001.mpeg"></vob>
<post>call menu;</post>
</pgc>
</titles>
.
.
.
</titleset>
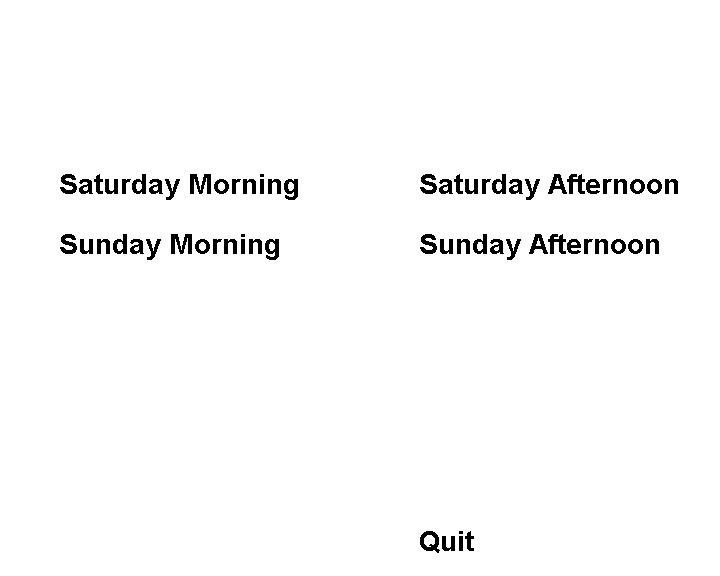
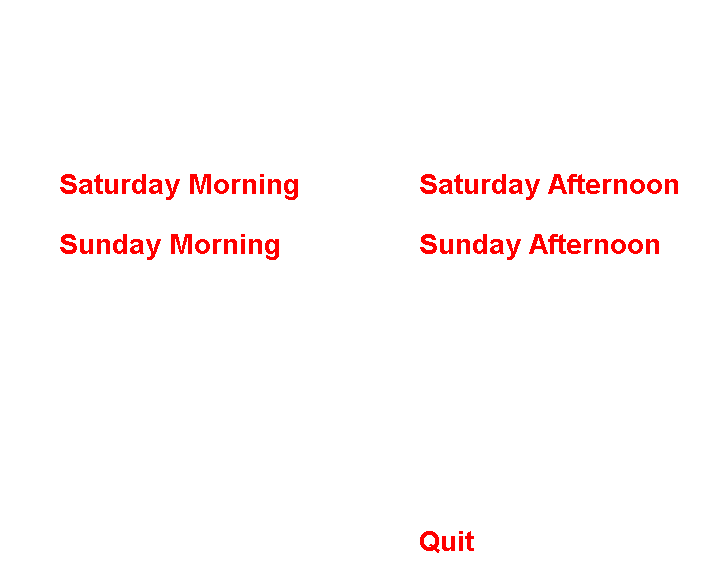
<titleset>
<menus>
<pgc entry="root">
<vob file="S_Main.mpg"></vob>
<button>jump menu 2;</button>
<button>jump menu 3;</button>
<button>jump menu 4;</button>
<button>jump menu 5;</button>
<button>jump vmgm menu;</button>
</pgc>

<pgc pause="5">
<vob file="sat_am.mpg"></vob>
<button>jump title 1 chapter 1;</button>
<button>jump title 1 chapter 2;</button>
<button>jump title 1 chapter 3;</button>
<button>jump title 1 chapter 4;</button>
<button>jump title 1 chapter 5;</button>
<button>jump title 1 chapter 6;</button>
<button>jump title 1 chapter 7;</button>
<button>jump title 1 chapter 8;</button>
<button>jump title 1 chapter 9;</button>
<button>jump title 1 chapter 10;</button>
<button>jump menu 1;</button>
</pgc>
.
.
.
<pgc pause="5">
<vob file="sun_pm.mpg"></vob>
<button>jump title 4 chapter 1;</button>
<button>jump title 4 chapter 2;</button>
<button>jump title 4 chapter 3;</button>
<button>jump menu 1;</button>
</pgc>
</menus>

<titles>
<pgc>
<vob file="ASA_000_001.mpeg"></vob>
<vob file="ASA_001_001.mpeg"></vob>
<vob file="ASA_002_001.mpeg"></vob>
<vob file="ASA_003_001.mpeg"></vob>
<vob file="ASA_004_001.mpeg"></vob>
<vob file="ASA_005_001.mpeg"></vob>
<vob file="ASA_006_001.mpeg"></vob>
<vob file="ASA_007_001.mpeg"></vob>
<vob file="ASA_008_001.mpeg"></vob>
<vob file="ASA_009_001.mpeg"></vob>
<post>call menu;</post>
</pgc>

<pgc>
<vob file="ASA_010_001.mpeg"></vob>
<vob file="ASA_011_001.mpeg"></vob>
<vob file="ASA_013_001.mpeg"></vob>
<vob file="ASA_014_001.mpeg"></vob>
<vob file="ASA_015_001.mpeg"></vob>
<vob file="ASA_016_001.mpeg"></vob>
<vob file="ASA_017_001.mpeg"></vob>
<vob file="ASA_018_001.mpeg"></vob>
<post>call menu;</post>
</pgc>
.
.
.
</titles>
</titleset>

</dvdauthor>
Obviously your needs will differ from mine, however I hope that these examples will help clarify the basics so that you will be able to adapt it to your needs with the aid of the dvdauthor and spumux manuals.
Before you commit your DVD to disc, it's probaly worth testing it from the hard drive. This can be done with xine by using the command:
xine dvd:/data6/video/Sheffield6/VIDEO_TS/N.B. the final / is required. This will allow you to check that your menus look reasonable and that they send you where you expect. It is very easy to miss out a file or to include a junk file that should have been omitted, and that will throw out all the rest of the titleset targets.
This section has been tried by me with DVD+R(W) media. It should work with DVD-R(W), but I don't have one to try. There are some notes on using dvd+rw-tools for dvd-r(w) media.
The tools used here are part of the dvd+rw-tools package.
I shall assume thoughout that you have your drive set up to use ide-scsi emulation, as that is needed to write CD media on it (DVD writing does not need this, but since every DVD writer I've ever seen also writes CDs you will probably have it set that way unless you are using the 2.6 kernel). Furthermore I'll assume that it's the only SCSI cd drive on the system, so the device will be /dev/scd0 (if it is somewhere else, just change the device name thoughout).
If you are using ±RW media then format the blank disk (unlike CD's DVD+RW media need to be formatted, for -RW media this is only needed if you wish to change recording mode):
dvd+rw-format /dev/scd0This is not needed for ±R media.
Now use growisofs to create the DVD (so with the directory used above), we have:
cd /data6/video
growisofs  -Z /dev/scd0  -V SHEFF03 -dvd-video Sheffield6
For more general information on writing data to DVD+RW, refer to the dvd+rw-tools web page.
For those using cdrecord.prodvd on DVD-R(W) media, the following is reported to be the appropriate command lines:
mkisofs -o /tmp/image.raw -dvd-video /data6/video/Sheffield6
cdrecord.prodvd  -v  dev=0,1,0 -useinfo driveropts=burnfree -pad -dao /tmp/image.raw
DVDs thus generated should play on any device that can handle the media. I've had success with xine on my Linux box (if xine exits with messages about encrypted streams, these are bogus and the problem is fixed in xine-lib beta-12 and later) and with Apple's DVD player on my iBook and on a hardware DVD player.
With my dvd writer I have had problems with cheap (store's own-brand) DVD+R media, tyically this shows up a very slow response times to the menus and pauses in playback in the later part of the disk (these problems manifest on both the PC and the Mac, but not on the hardware player); name-brand blanks on the other hand have never shown these problems. Possibly the el-cheapo disks stretch too much when spun up (the later chapters and the top-level menus are at the outside of the disc)?
Without the work of all those developers who have contributed to the tools described here Linux users would still not be able to write their own DVDs.
![]()
![]()